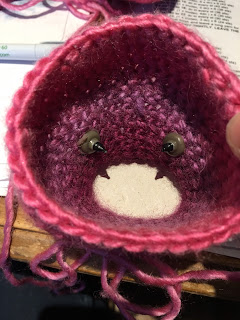
So my task for the Christmas break was to finish another pet for the collection and decided on a micro pig. The bright pink in the riot chunky (Dawn) collection was calling to me, a bit cliche to use pink for a pig but I think Tallulah worked out well and the pink to dark plum colourways suited this design.
The body was tackled first which is roughly the same as Milo the Cat and as it is the same all around and the shaping is minimal. The good thing about designing animals is once you have one or two designed the others are usually a variation of the patterns of the others.
It was important to get the nose right on this pig as a snout is usually boxy in shape. To keep the shape of the nose during stuffing I wedged thick card into the nose so it would keep the perfect flat round snout shape. You can see from the image below the card firmly placed in the nose.

Deciding on the size and placement of eyes was a long decision. It was between a 8mm or 10mm eye and then near together or far apart. The head sat on my desk for a good 24 hours while I decided as once you commit to pushing the backs of the eyes on there is no going back. So 10mm it was with a far apart placing, backs pushed on so just had to make it work now. Its important to take the time on the face as this will determine everything ultimately, this is what gives the design personality. The next problem was the markings on the nose, I was looking forward to this part and had the idea it would be simple and sew on some round markings - well it looked awful. I tried using little buttons, then heart shaped buttons, black felt, pink felt, brown thread, grey thread, everything I tried I really didn't like. Again I left the head on my desk overnight to rethink.
After a nights sleep to rethink, I got a contrast colour within the yarn and simply sewed two lines on the nose - voila nose finally sorted. So straight onto the trotters, I took the front paws from the Bruno the Puppy pattern and once the round foot was crocheted a little bit of stuffing needs to be put in. You can see from the image below before the leg section is crocheted stuffing needs to go into this part. Once stuffed the rest of the leg could be completed. Then I got some grey embroidery thread and sewed in a line in middle of the trotter and pulled in tight so you create essentially two toes either side. Again take the time to puff up the trotter shape. I made all four in one go and they were on the coffee table when my best friends and her husband were over. He looked at them and had a very confused look on his face, I won't say what he thought they were as slightly rude but very funny.
I forgot to mention the tail, This is a fun crochet project and a great pattern for using for any spiral design. They look great as spiral mohair scarfs. You simply chain then in each chain you 2 x dc, then on the next row you 3 x dc into dc, so you are constantly increasing every stitch which makes the spiral. Very easy and very effective. All thats left to do now is sew up and give your micro pig a name. Hope you enjoy making Tallulah.
I used King Cole Riot Chunky in colour Dawn


No comments:
Post a Comment