Inspiration
Whether you’re preparing for the birth of a baby, or looking for a special gift for an existing sprog, knitted goodies make for the perfect present. For one thing, chances are high that it will be cherished for years to come. For another, there’s very little chance of experiencing that sinking feeling… you know, the one that comes from muted thanks—and the awkward realisation that you’ve produced exactly the same outfit as another well-wisher.
So, having opted for unique and original, it’s time to decide on specifics. This is where you can really let your imagination run loose. There are tonnes of useful ‘baby things’ to make: warm garments, snuggly comforters and squishy toys are all sure to go down well. And one of the best things about knitting for babies is that whatever item you choose, it’s sure to look cute.
Some things to think about
Time
More so, perhaps, than other projects, knitting for babies may throw up the added pressure of a time restraint—particularly if you’re planning on delivering the gift to a newborn. There’s nothing wrong with ambition (and plenty that’s right with it), but a beginner knitter with no experience of the craft may struggle to produce a complex design with only a couple of weeks until the due date! Bear in mind that babies grow quickly; a modest, punctual present will always beat an expert-level knit that no longer fits.
The issue of time is easily resolved. Right here on site, we have patterns to suit every level: from simple blankets to advanced level designs—and if you’re lacking in inspiration, you could always turn to other corners of the internet (we won’t be offended, promise!). At the moment, we’re loving the ideas on this blog.
For knits that are sure to stand the test of time, consider an alternative to clothing. If you feel up to the challenge, you can’t get cuter than Kawaii. Our patterns draw on traditional Japanese culture; you’ll end up with an adorable toy, fit to become baby’s favourite. Alternatively, mermaid tails are all the rage right now—and you’re never too young for a little magic.
And no matter what level you are, and whatever you choose to make, it’s always possible to add a personal touch. Using a shade that complements the baby room, or opting for the parents’ wedding colours, are both great (and simple) ways to show extra thought.
Yarn
Then, of course, there is the issue of yarn. Comfort, washability… you only have to tentatively explore the subject on Mumsnet to discover that people hold pretty strong opinions about baby wool. But it’s worth considering all the options in order to make an informed choice.
Then toss the ‘baby needs best’ mentality into the mix and you have cost considerations too. And whilst it’s true that your gift may make it into the ultimate box of baby-dom, looked back on with great affection, and handed down from generation to generation, it’s worth remembering that babies are, by their very nature, young. There could be years and years of present-giving ahead of you: breaking the bank on the first might not be a sensible start.
What’s clear to all, though, is that babies merit different, less fibrous yarns to those that can be tolerated by adults (no child deserves a hairball). And, since the item will be worn or cuddled in (and sucked, chewed and slobbered over) by the most messy adorable of humankind, the wools will need to be both washable and soft, at an affordable price.
So, what yarn should you choose that knits together all these considerations?
Many believe that only natural wools, known for their softness, are suitable for youngsters, but these are generally the most expensive. Others advocate the merits of acrylic—cheaper, more easily washed and dried… but perhaps not so cozy.
Synthetics
Many knitters dismiss synthetic yarns out of hand for babies. Cygnet Baby Pato, made of 100% acrylic, should set your mind at ease. Its price reflects the man-made nature, but it’s extremely versatile. It’s also a great option for little ones who suffer from allergies, as it contains no animal fibres, and is perfect for consistency when knitting large items: there is very little variation between different batches and you can usually count on man-made fabrics to be machine washable.
To avoid bobbling over time, consider an anti-piling synthetic. King Cole’s Cherished yarns are made from a special acrylic designed to retain a bobble-free existence.
Blends
By mixing different fibres, you can add value to a yarn –without adding much to the price tag.
Polyamide is fire resistant, and can be combined with acrylic to achieve a yarn that balances comfort with cost. Far from being itchy or uncomfortable, James C Brett’s Supreme Soft & Gentle yarn is luxurious in appearance, and supersoft to the touch. At an affordable price, there are both double knitting (DK) and 4 ply versions available—less confident knitters will find the former a little easier to work with. Alternatively, Jenny Watson’s Babysoft range is available in a variety of beautiful pastels and is designed to be especially gentle on young skin.
Acrylic and nylon also make for a gorgeous combination, as proven by King Cole’s Comfort range. Nylon increases the overall elasticity of a yarn, which will help to make your gift durable. There are no less than 20 colours to choose from, ideal for any cozy knit you can think of. Snuggly Baby yarns by Sirdir are an equally affordable option. This range is also sure to keep its shape in the washing machine, and can be tumble dried—hugely useful for baby gifts.
If you can’t quite get behind full-blown synthetics, a blend that includes natural fibres could make for the ultimate combination. Not so premium in price as pure Merino, a mix of wool, cotton and acrylic make up these fun, multi-coloured balls, and will keep your knit both exceptionally soft and highly durable: a win-win.
Natural Fibres
Of course, choosing cheap wool is all relative. For instance, if you’re convinced that your gift will be recycled (perhaps it’s for a child who has younger siblings), then there’s nothing to stop you opting for luxury. This doesn’t have to be expensive; Wool4less offers Peter Pan 100% Merino at a price competitive to many of the mixes above—and you can be assured of quality, comfort and a beautiful finish.
The Finished Product
When you’ve decided on a yarn—and all’s purled and knitted—you’ll end up with a special keepsake that hasn’t cost you the earth.
Of course, the subject themself may not thank you immediately. After all, when there are booties to be worn, blankets to be swaddled in and toys to be tossed around, there’s little time for words. But with time comes appreciation—and handmade gifts often become treasured heirlooms, long after baby is fully fledged.
From crib to cuddles (and back again) a handmade gift will get plenty of use—especially if you plan things right.

Wednesday, 8 March 2017
Friday, 17 February 2017
Spring Easter Lambs
This is a quick blog to let you know that I made a quick little lamb pattern for Wool4less who are letting everyone download it for FREE!! They wanted me to use the tinsel yarn that has a huge following. So I wouldn't want anyone to miss out that maybe reading this blog, so if you like them head over there to download a copy.
http://www.wool4less.co.uk/FREE-Tinsel-Spring-Lamb-Pattern_A21EPX.aspx


http://www.wool4less.co.uk/FREE-Tinsel-Spring-Lamb-Pattern_A21EPX.aspx


Monday, 6 February 2017
Button Bears
When I started this new design I didn't really think I would seriously fall in love with it, but I have. Especially the BIG bear who I have named Bernie. I had a vision of what they would turn out like but I'm so pleased with the end result and I hope if anybody decides to make their own they will be happy too. The sketch below was my starting point, a very simple teddy shape.

I have made the pattern three times in exactly the same way but the little one Olly is make in DK, Theo in chunky and Bernie in super chunky. Here are my hints and tips in getting the best out of the design.
I always start with the body as its a simple part of the pattern and you can get your tension quickly as there is not much shaping, plus you get an instant sense of what the overall size will be. Next I tackle the head. You start with the lighter colour as the head pattern begins at the nose section. There is shaping around the cheek area and in the pattern you increase both sides. When you come to stuffing the head you need to stuff these areas fuller as you have created the space. This gives the bear face a fuller face. At row 11 you change to the dark brown, I simply tied the two colours together for the join and the knot will disappear in the head when you stuff. After row 22 its time to position the eyes. I played with different sizes and spacing for quite some time and plucked for 8mm on the DK version with little spacing. I placed them on the first row of the brown with only one whole stitch between them. Of course play with the eyes and position them where you like best. After row 29 I started to stuff the head. I really stuffed the nose and head. Use the end of a bigger crochet hook and move the stuffing into the areas that need extra shaping like the cheeks and top of the head. Finish the last 4 rows, stuff a bit more into the back of the head and then close up.


I always do the face once I have the head stuffed, I like to see what it will look like. I cut black felt for nose which I placed towards the top of the nose. I carefully pinned in place and secured by sewing a running stitch around the nose. Then with embroidery thread I placed one long line coming from the centre of the nose at the bottom directly down 6 rows below, from there I went either side in two parts 11 stitches. I did one long thread to stitch 6 and then another long thread for the remaining 5 stitches. I repeated this on the other side.


I have made the pattern three times in exactly the same way but the little one Olly is make in DK, Theo in chunky and Bernie in super chunky. Here are my hints and tips in getting the best out of the design.
I always start with the body as its a simple part of the pattern and you can get your tension quickly as there is not much shaping, plus you get an instant sense of what the overall size will be. Next I tackle the head. You start with the lighter colour as the head pattern begins at the nose section. There is shaping around the cheek area and in the pattern you increase both sides. When you come to stuffing the head you need to stuff these areas fuller as you have created the space. This gives the bear face a fuller face. At row 11 you change to the dark brown, I simply tied the two colours together for the join and the knot will disappear in the head when you stuff. After row 22 its time to position the eyes. I played with different sizes and spacing for quite some time and plucked for 8mm on the DK version with little spacing. I placed them on the first row of the brown with only one whole stitch between them. Of course play with the eyes and position them where you like best. After row 29 I started to stuff the head. I really stuffed the nose and head. Use the end of a bigger crochet hook and move the stuffing into the areas that need extra shaping like the cheeks and top of the head. Finish the last 4 rows, stuff a bit more into the back of the head and then close up.


Onto the ears. The outside of the ear is very simple, when it is completed I sewed up the end and left a long thread for attaching to the head. The inner lighter brown of the ear is not crocheted in the normal amigurumi style and is simply rows of crochet decreasing in at the end. Once these inner ears are complete pin neatly into the outer ear and pull the inner ear to fit completely, once happy then sew into place and then use the darker brown thread to sew the ear to the head. I placed the ears 5 rows back from the eyes making sure that both sides of the ear are positioned on the the same row.
Making the limbs is pretty simple. When you come to stuff them, you need to stuff tightly in the hand and foot sections. The 1/3 at the top of the arm and 1/3 of the top of the leg are not filled at all, as they need to be flat so the button can be pressed against them. When sewing up the open ends of both the arms and legs try and create a rounded shape as they will be on view so the neater the better. You can see from the photo below how I have sewn up the end but given it a curved shape. The light brown pads are placed towards the bottom of each foot rather than right in the centre.


Now it is time to put your bear together. I highly recommend you watch the you tube clip below on how to sew on the arms and legs using the button method. These steps are exactly the way I assembled the bears. I could write it all down but that would be more confusing. You will need a long doll needle which I had to quickly purchase (ebay is always my go too when it comes to late night crafting purchases). Remember to check the legs both reach the ground and not one leg is higher than the other before pulling them tight. After I had put on the limbs I then finally sewed on the head.
I hope you enjoy making your own button bear.


All yarn supplies are from www.wool4less.co.uk and they sell the pattern and the kits for all 3 bears.


Thursday, 12 January 2017
Hello Tallulah
Already in the second week of January and I'm getting so confused thinking it is April as the weather is so mild and the garden plants have tiny little buds already. They are talking of a cold belt arriving tomorrow onwards but it never really seems to effect me on the far East Coast - thats probably a good thing right?
So my task for the Christmas break was to finish another pet for the collection and decided on a micro pig. The bright pink in the riot chunky (Dawn) collection was calling to me, a bit cliche to use pink for a pig but I think Tallulah worked out well and the pink to dark plum colourways suited this design.
The body was tackled first which is roughly the same as Milo the Cat and as it is the same all around and the shaping is minimal. The good thing about designing animals is once you have one or two designed the others are usually a variation of the patterns of the others.
It was important to get the nose right on this pig as a snout is usually boxy in shape. To keep the shape of the nose during stuffing I wedged thick card into the nose so it would keep the perfect flat round snout shape. You can see from the image below the card firmly placed in the nose.
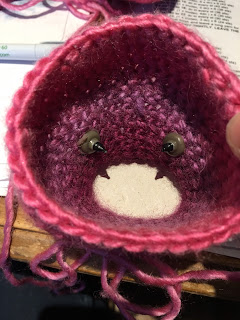

Deciding on the size and placement of eyes was a long decision. It was between a 8mm or 10mm eye and then near together or far apart. The head sat on my desk for a good 24 hours while I decided as once you commit to pushing the backs of the eyes on there is no going back. So 10mm it was with a far apart placing, backs pushed on so just had to make it work now. Its important to take the time on the face as this will determine everything ultimately, this is what gives the design personality. The next problem was the markings on the nose, I was looking forward to this part and had the idea it would be simple and sew on some round markings - well it looked awful. I tried using little buttons, then heart shaped buttons, black felt, pink felt, brown thread, grey thread, everything I tried I really didn't like. Again I left the head on my desk overnight to rethink.
After a nights sleep to rethink, I got a contrast colour within the yarn and simply sewed two lines on the nose - voila nose finally sorted. So straight onto the trotters, I took the front paws from the Bruno the Puppy pattern and once the round foot was crocheted a little bit of stuffing needs to be put in. You can see from the image below before the leg section is crocheted stuffing needs to go into this part. Once stuffed the rest of the leg could be completed. Then I got some grey embroidery thread and sewed in a line in middle of the trotter and pulled in tight so you create essentially two toes either side. Again take the time to puff up the trotter shape. I made all four in one go and they were on the coffee table when my best friends and her husband were over. He looked at them and had a very confused look on his face, I won't say what he thought they were as slightly rude but very funny.

Ears were a slight adaption on Milo the Cats just longer. With everything made i just played with positioning. As I always say take your time on this part, don't sew anything into place until you really like the way it looks. Take photos of each position so you can quickly see them altogether which makes it easy to quickly compare how they look.


So my task for the Christmas break was to finish another pet for the collection and decided on a micro pig. The bright pink in the riot chunky (Dawn) collection was calling to me, a bit cliche to use pink for a pig but I think Tallulah worked out well and the pink to dark plum colourways suited this design.
The body was tackled first which is roughly the same as Milo the Cat and as it is the same all around and the shaping is minimal. The good thing about designing animals is once you have one or two designed the others are usually a variation of the patterns of the others.
It was important to get the nose right on this pig as a snout is usually boxy in shape. To keep the shape of the nose during stuffing I wedged thick card into the nose so it would keep the perfect flat round snout shape. You can see from the image below the card firmly placed in the nose.


Deciding on the size and placement of eyes was a long decision. It was between a 8mm or 10mm eye and then near together or far apart. The head sat on my desk for a good 24 hours while I decided as once you commit to pushing the backs of the eyes on there is no going back. So 10mm it was with a far apart placing, backs pushed on so just had to make it work now. Its important to take the time on the face as this will determine everything ultimately, this is what gives the design personality. The next problem was the markings on the nose, I was looking forward to this part and had the idea it would be simple and sew on some round markings - well it looked awful. I tried using little buttons, then heart shaped buttons, black felt, pink felt, brown thread, grey thread, everything I tried I really didn't like. Again I left the head on my desk overnight to rethink.
After a nights sleep to rethink, I got a contrast colour within the yarn and simply sewed two lines on the nose - voila nose finally sorted. So straight onto the trotters, I took the front paws from the Bruno the Puppy pattern and once the round foot was crocheted a little bit of stuffing needs to be put in. You can see from the image below before the leg section is crocheted stuffing needs to go into this part. Once stuffed the rest of the leg could be completed. Then I got some grey embroidery thread and sewed in a line in middle of the trotter and pulled in tight so you create essentially two toes either side. Again take the time to puff up the trotter shape. I made all four in one go and they were on the coffee table when my best friends and her husband were over. He looked at them and had a very confused look on his face, I won't say what he thought they were as slightly rude but very funny.


I forgot to mention the tail, This is a fun crochet project and a great pattern for using for any spiral design. They look great as spiral mohair scarfs. You simply chain then in each chain you 2 x dc, then on the next row you 3 x dc into dc, so you are constantly increasing every stitch which makes the spiral. Very easy and very effective. All thats left to do now is sew up and give your micro pig a name. Hope you enjoy making Tallulah.
I used King Cole Riot Chunky in colour Dawn

Thursday, 15 December 2016
Fresh Ideas
I am excited about the New Year, as I have been approached by the magazines Let's Knit, Inside Crochet and Knitting and Crochet to feature the Kawaii Designs. I have been working on another pet which will be a free pattern launch in the Knitting and Crochet Magazine in the New Year, but I am not allowed to say what it is until it officially goes in the mag.
However what I can say is I am currently working on another pet which will be a goldfish but isn't actually gold in colour. I hope to get this finished very soon and on our Etsy shop and on the Wool4less site as a free download.
Here is the start of it, name to be determined. Its not until the eyes go in will I be able to think of a suitable name, any suggestions welcome. Not sure at this stage either how elaborate to make it, thinking a simple fish like the ones you win at Fairs or a more ornate fish with the goggly eyes.

Any ideas on pets you would like to make let me in the future please know. I have lined up to make a micro pig and a tortoise.
Finished Bubble the Goldfish.

Friday, 9 December 2016
Creating Bruno
So why did I even decide to start creating designs of my own? Well I am always adapting crochet patterns and I had a really bad habit of never writing down what I had done and then of course I would be asked "how did you do that?". and being the total amateur I am I said "just did it". After many a disappointed face I thought I really must start noting my patterns. I love the art of amigurumi and thought I would trial out my own. I thought I would start with a dog as it maybe the simplest in shape to master. I also love the variegated yarns you can get and knew I would use these rather than plains to give a completely different effect. Oh and then I thought be totally radical and use Chunky!! I used Riot Chunky in shade Rhinestone for Bruno.
http://www.wool4less.co.uk/King-Cole-Riot-Chunky-100g-NEW-COLOURS_AZ2T7.aspx
I know traditionally you use DK for amigurumi but I like to live dangerously :) So armed with a 4.5mm hook I started.

Beginning with the body and a magic ring/loop of 6dc. If you have never done a magic ring/loop before I would recommend you look up an easy tutorial on youtube. Thats what I did years ago and it does make such a difference to toy making. Here is quite an easy one for a starter for ten.
https://www.youtube.com/watch?v=YfKKoU4HpCs
Once you give it a go a couple of times it becomes second nature. You can see from the pic below that the centre is completely closed up, and you can also see my new kitten Fizz enjoying the whole yarn experience also. I used a paperclip as my stitch marker simply because it was nearest thing to hand on my desk that would do the job.


My top tips for assembling are:
1. take each individual part and take the time to shape them. So for the head, I really took the time to shape Bruno's nose and puffing out his cheeks either side of the line under his nose. I use a thick sewing up needle to manipulate the stuffing where I want it. I did the same for the paws and created fullness for toes.
2. once your happy with the individual shapes, get some long dressmaker pins and pin the parts on to the main body. Be symmetrical as you can, ie if you like the ear 6 rows in then place the second ear 6 rows in. Play with different positions, take a photo of each one incase you forget where you put things while rearranging. This helps me to then compare which positions look best overall.
3. head positioning is probably one of the biggest factors into cuteness status. Try putting the head to one side looking either slightly down or up, it will transform how cute your little critter can look.
So happy with the final positioning, I sewed very tightly each part into place. Then final manipulation of stuffing if needed as when holding to sew I tend to squeeze quite tightly and sometimes lose a little of the shaping. Hide all the loose ends and then hey presto Bruno was finished.


http://www.wool4less.co.uk/King-Cole-Riot-Chunky-100g-NEW-COLOURS_AZ2T7.aspx
I know traditionally you use DK for amigurumi but I like to live dangerously :) So armed with a 4.5mm hook I started.

Beginning with the body and a magic ring/loop of 6dc. If you have never done a magic ring/loop before I would recommend you look up an easy tutorial on youtube. Thats what I did years ago and it does make such a difference to toy making. Here is quite an easy one for a starter for ten.
https://www.youtube.com/watch?v=YfKKoU4HpCs
Once you give it a go a couple of times it becomes second nature. You can see from the pic below that the centre is completely closed up, and you can also see my new kitten Fizz enjoying the whole yarn experience also. I used a paperclip as my stitch marker simply because it was nearest thing to hand on my desk that would do the job.

I have to say that it was a new discipline to remember to have to write down everything I did. I carried on with the round then started to shape up the sides. Its quite a simply formula to creating a flat circle in crochet which I use for the base of a lot of the animals I make. You start with your magic ring of say 6dc, then for the next round you increase in each dc so you double your stitches, then your next row will be 1 x increase, 1 x dc all the way around, then the next row will be 1 x increase, 2 x dc all the way round and you continue in this way adding an extra dc to each round until you get the circle to the desired dimensions. Its a great one to remember, so you can make round coasters, table mats, rugs, anything you want to be round and flat.
So where was I? I shaped the body which is like a round container, so their was not particularly any hard shaping involved. You can see from my messy work station the body completed and stuffed. My terrible hand written notes which will only serve to frustrate me later when I had to type them up properly. You can also see the starting of another body part with is in fact the head and the snout part is what you can see.

The head took me an age. Crocheting it up to only pull it down again, that's always been one of the great benefits of crochet that it never takes long to redo what you undo, unlike knitting. Starting with the nose and working out by increasing to evolve into a head shape. Once I was happy with the nose and the front of the face this is the time you have to commit to your work by placing the eyes as you wont be able to reach very well once you go further. I used 10mm black eyes. Once the rest of the head was finished, it was stuffed compactly and because it still didn't look very interesting I stitched the nose on, then it seemed to come alive just a little bit.

Ok so body and head finished it was time to create the paws, ears and the simplest of all the tail. I knew I wanted Bruno to sit down so that meant the would need to be two different sets of paws. The back paws I made chunky as they would need to help the whole design to sit, and the front are only stuffed in the bottom part so when they are sewn in place they don't stick out to far from the body. I used the same colour as the nose to sew on the paw markings. I made them quite tight and then I manipulated the stuffing in-between the toes to give more definition. I wanted biggish ears so that they could be sewn easily into different positions, they were simply made by creating a circle and then increasing and decreasing. They naturally fold in half to create this floppy ear shape - no stuffing required.


Now the major parts had been made and stuffed it was time to sew them together. The assembly in my opinion is the most important part and should not be rushed in anyway, and never sew any parts on unless you think that it looks really good in that place.
My top tips for assembling are:
1. take each individual part and take the time to shape them. So for the head, I really took the time to shape Bruno's nose and puffing out his cheeks either side of the line under his nose. I use a thick sewing up needle to manipulate the stuffing where I want it. I did the same for the paws and created fullness for toes.
2. once your happy with the individual shapes, get some long dressmaker pins and pin the parts on to the main body. Be symmetrical as you can, ie if you like the ear 6 rows in then place the second ear 6 rows in. Play with different positions, take a photo of each one incase you forget where you put things while rearranging. This helps me to then compare which positions look best overall.
3. head positioning is probably one of the biggest factors into cuteness status. Try putting the head to one side looking either slightly down or up, it will transform how cute your little critter can look.
So happy with the final positioning, I sewed very tightly each part into place. Then final manipulation of stuffing if needed as when holding to sew I tend to squeeze quite tightly and sometimes lose a little of the shaping. Hide all the loose ends and then hey presto Bruno was finished.


The Bruno in the picture below I have sewn into a lying down playful position

If you are interested in making your own Bruno then you can find the pattern on both our Etsy shop or at www.wool4less.co.uk who are selling kits also.
Happy Creating :)
Subscribe to:
Posts (Atom)